EXPLAINED: Restoring a 1950s Rolex Oyster Perpetual Ref. 6074
A well worn and treasured Rolex Oyster Perpetual ref. 6074 is brought back to life by Henrik Korpela, principal of independent Swiss watchmaking school KHWCC. Korpela himself explains the process of restoring the family heirloom, all the while maintaining its character, in enlightening detail.
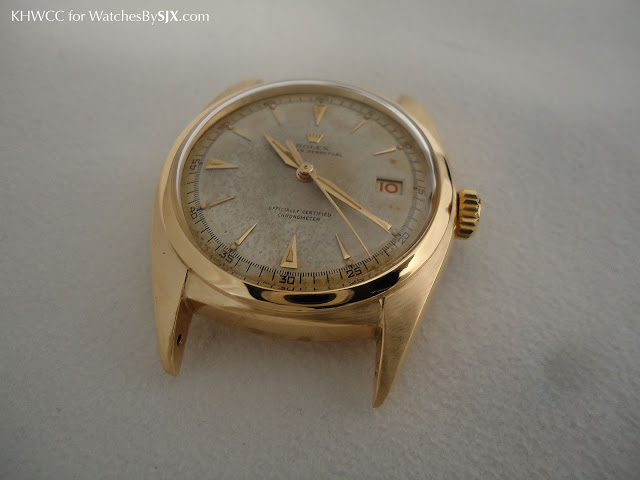
Part of an ongoing series of technical articles by Henrik Korpela, founder of KHWCC, an independent watch school, this story details the restoration of a yellow gold Rolex Oyster Perpetual Date ref. 6074 dating from the 1950s. Inherited by the owner from his late father, the watch was well used in the six decades since it left the factory. Despite obvious scars, it remained intact (as an Oyster case should), requiring a sympathetic restoration that would make it functional while retaining the history written all over the watch.
Henrik deftly mended the watch, both inside and out, while ensuring that it was left as original as practically possible. The extensive restoration, both inside and out, is detailed by Henrik, along with his photos, right here.
___________________________
The beginning
This project came to me a while back from a Singaporean business partner, whom I have worked with on a number of restoration jobs and unique timepieces. He had inherited it from his father, who had worn this Rolex while a supervisor at plantations in South East Asia for several decades. It was his father’s first watch and only watch, becoming the only keepsake the client had of his father. The Rolex holds a special place in the client’s heart and bears great sentimental value.
We assessed the Rolex Oyster Perpetual to be from the 1950s, which was confirmed by the client. It was surprisingly in good condition, despite having spent many years out in the humid fields – a testament to Rolex quality and the waterproof Oyster case. It had worked for some time after being inherited by the client, and had in fact undergone some basic servicing at informal watch workshops.
While they had done a fairly decent job in extending the working life of the movement, they lacked the specialised tools and skills to care for a family heirloom, resulting in quite a number of unintended scratches and marks on the case and the movement. When the Rolex came to us, it was only working intermittently and its timing was erratic. Because of its personal value, the client wanted us to restore it, but keep it as original as possible.
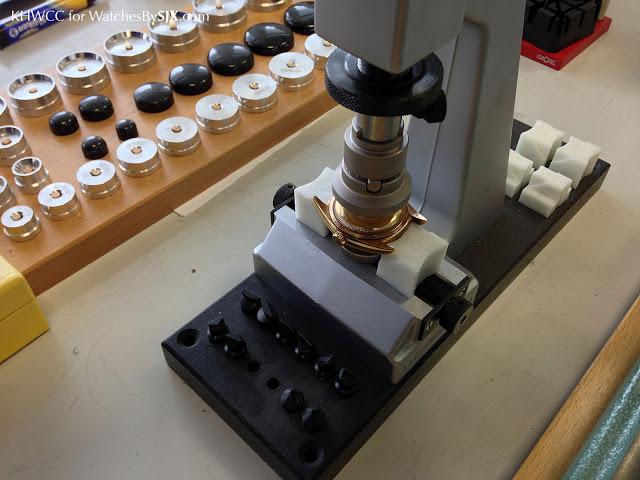
The right tools
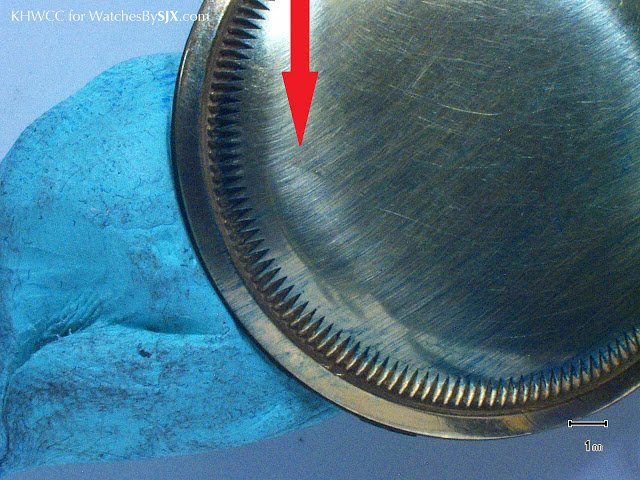
Before anything can happen, the right tools are needed. Some may not realise that Rolex watches require specialised tools to open – instead of conventional notches in the back, Rolex Oyster case backs have finely fluted rims. Earlier servicing of the watch was done with incorrect tools for opening the case back, hence the damage to the case back.
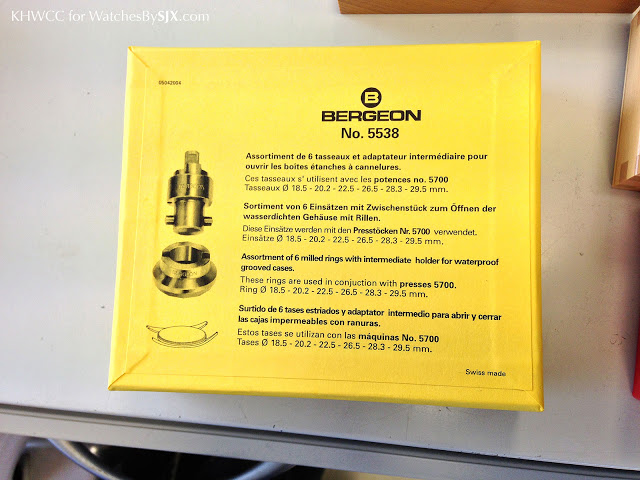
We did not have the particular tool in our workshop, but we were very lucky that Bergeon – the official tool maker for many a watch brand – had a set in stock. The tools are fairly difficult to find, being in Le Locle where Bergeon is located does help. Soon a set landed on our workbench.
The movement
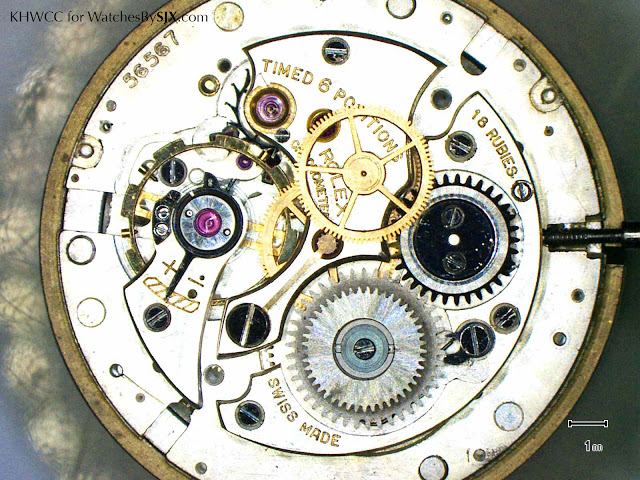
According to the reference work Automatic Wristwatches from Switzerland by Heinz Hampel, the calibre 620 NA was introduced in 1931, found inside the world’s first wristwatch fitted with an oscillating weight winding in one direction, the Oyster Perpetual. The movement inside this particular Oyster ref. 6074 is the 630 NA with centre seconds, a later variation but otherwise identical to the 620 NA.
The 630 NA is an automatic movement running at 18,000 bph, featuring a Swiss lever escapement with no shock absorbers, as was common at the time. It features a Breguet overcoil balance spring with cap jewelled escape wheel. This movement was marked 56567 on the main plate, with an additional marking of G6435 on the automatic bridge.
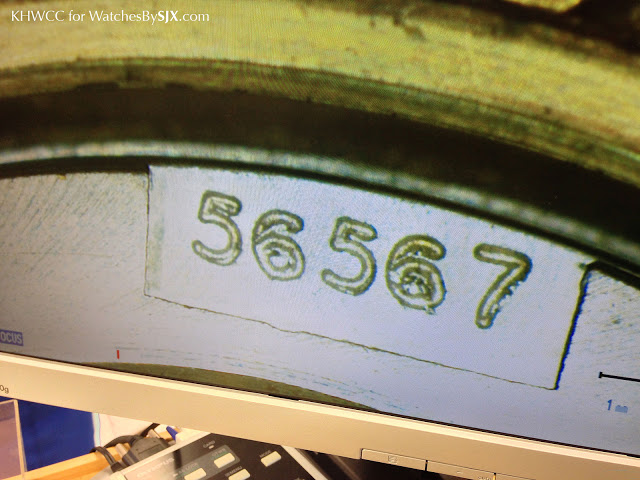
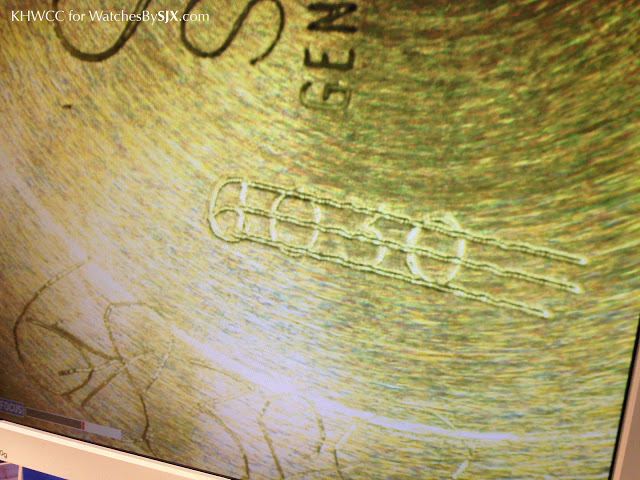
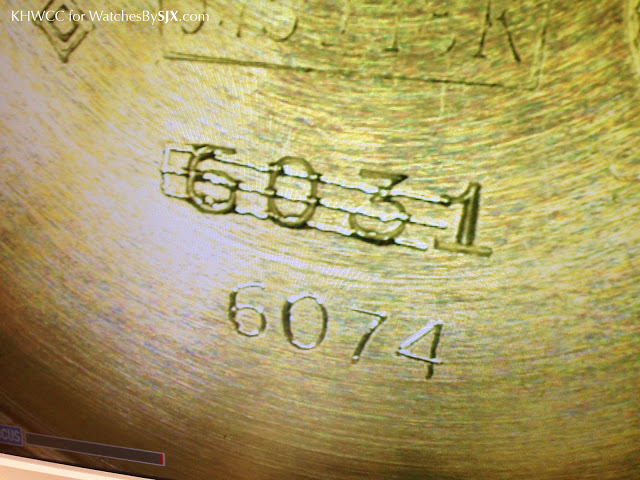
Notably the case back featured two sets of model numbers, “6030” and “6031”, which were scratched out and replaced with “6074”. This probably means the case back was originally produced for an earlier Oyster model, but eventually fitted to this ref. 6074.
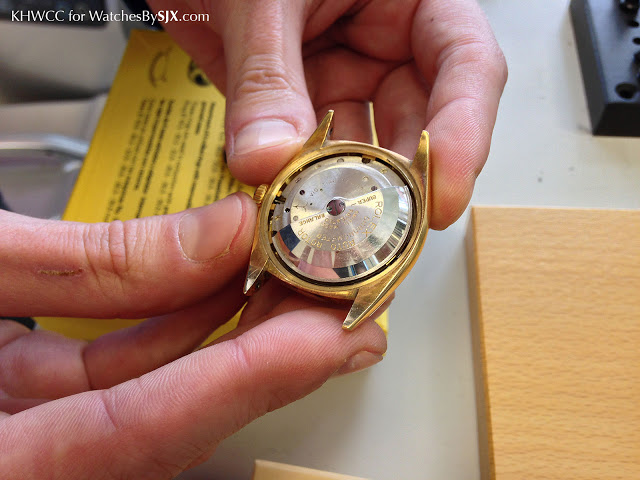
Before restoration
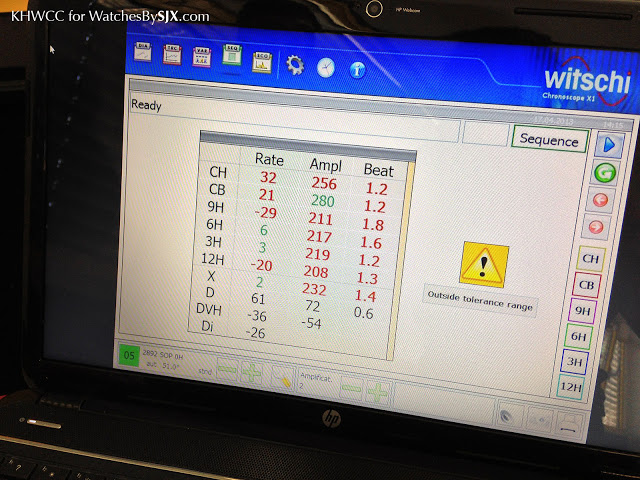
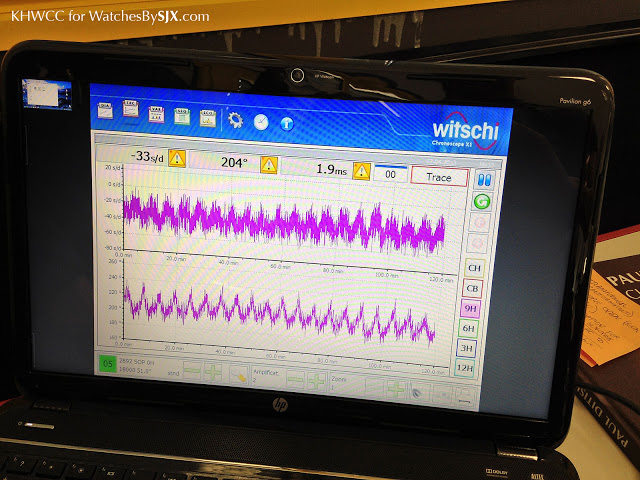
The watch had quite a number of problems, but nothing critical, a surprise given the age of the watch and its history. The diagnosis picked out the following issues:
1. Dial discoloured due to water damage, possibly due to moisture entering the case because of a cracked crystal.
2. Crystal with cracks and clouding.
3. Scratches and dents on the movement bridges.
4. Date not working, with date disc installed in an incorrect position.
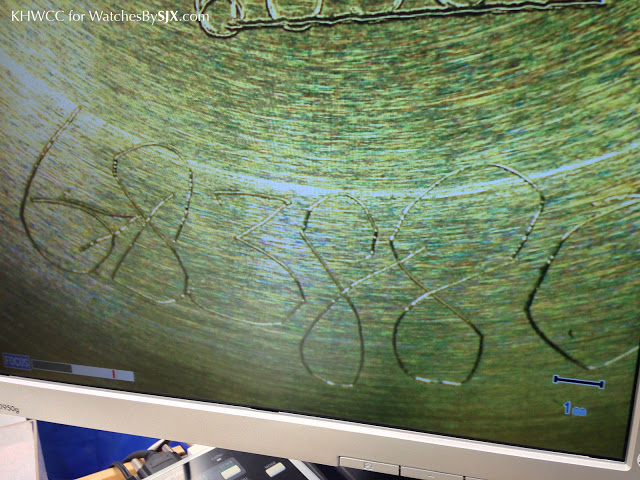
5. Inside of case back with two previous repair signatures scratched in.
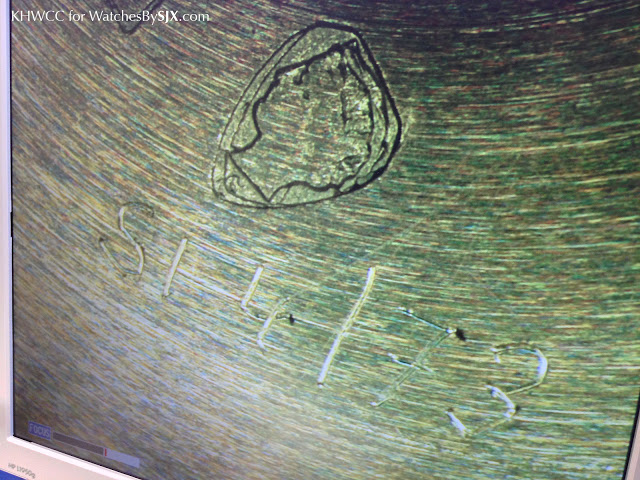 |
| Repair signatures from earlier watchmakers |
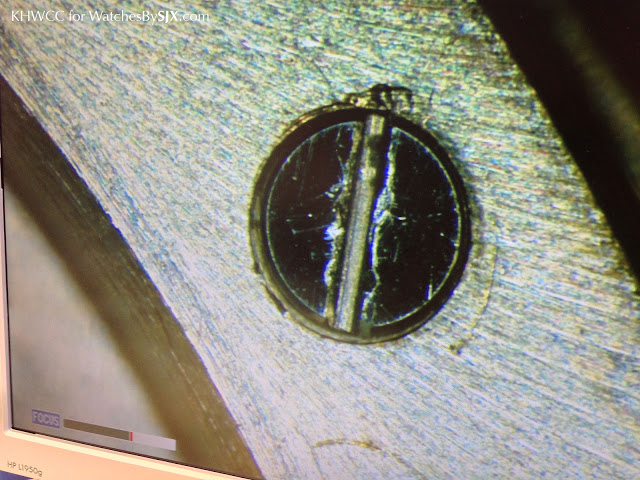
6. Case with deep dents at two o’clock on the case-band, as well as five and seven o’clock on the bezel.
 |
| A pinpoint dent in the case |
7. No shellac (adhesive) on pallet fork and roller; consequently jewels loose.
8. Movement lacking lubrication, running with low amplitude and out of beat.
9. Case-back slightly bent, with deep dents, possibly from being dropped and attempts to force case back open during earlier servicing.
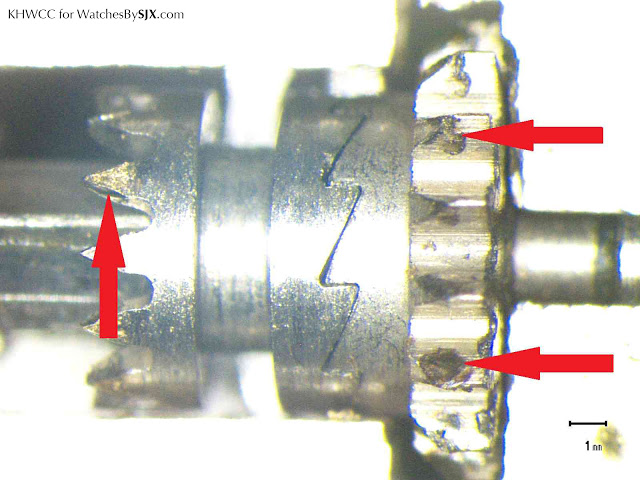
10. Screws in movement damaged and scratched, caused by improper tools and technique during servicing.
11. General wear and tear.
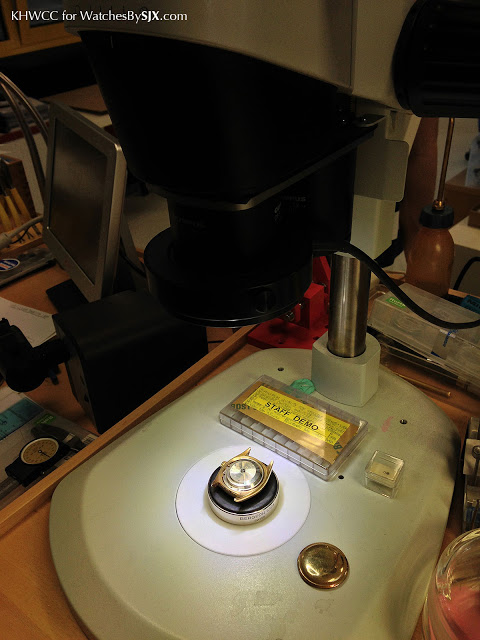
The restoration
An overhaul of the watch was performed, with key highlights explained step by step below. The repair comprised of:
1. Complete disassembly, cleaning, lubrication and re-assembly
2. Regulation of rate and functionality check
3. Application of new shellac on pallets and roller jewel
4. Correcting warping of wheels
5. Adjusting of pallets
6. Corrections to balance spring
7. Light polishing of case and replacement of crystal
8. Repair of date mechanism
9. Burnishing of balance staff pivots
10. Exchanging mainspring with sliding bridle.
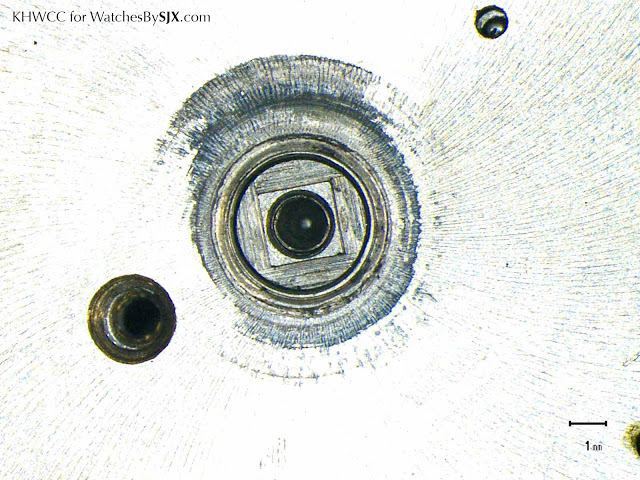
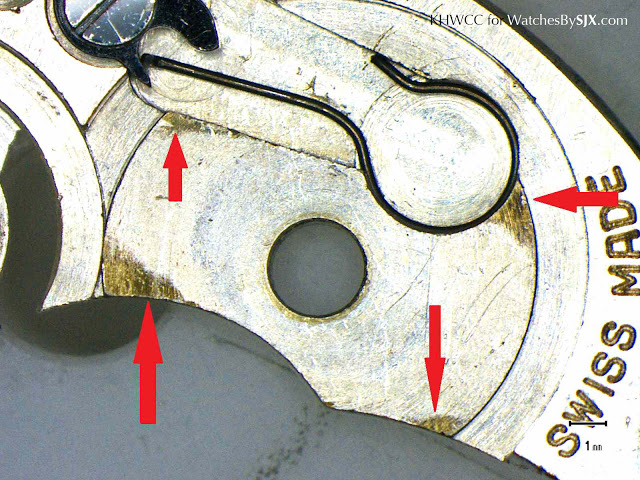
The date mechanism
The date display was jammed, stuck in between “19” and “20”.
.jpg)
Removing the dial gave showed us the problem. The blued steel frame carrying the date disc had a lot of scratches, likely previous watchmaker trying to fix it with not much care. The frame did not hold the date disc securely and was sliding around under the date disc instead of carrying the disc around. This was easily fixed by repositioning the date disc and securing it.
.jpg)
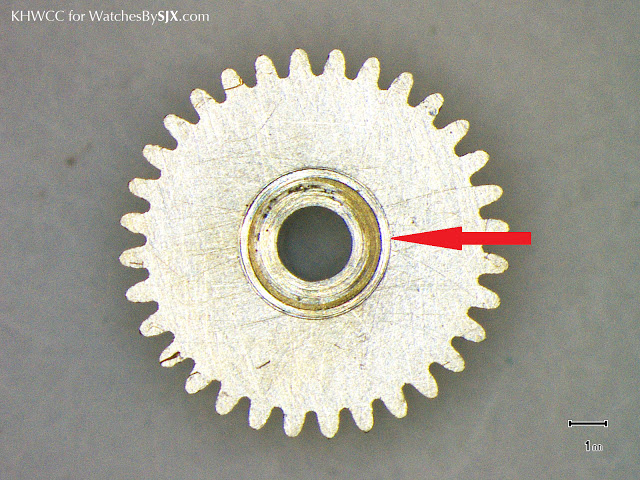
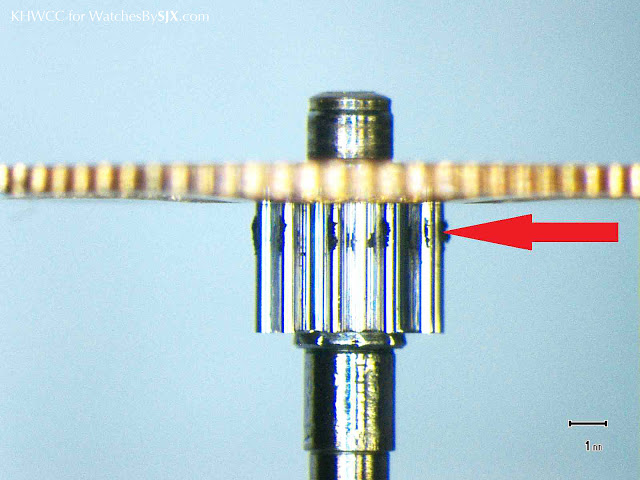
The winding mechanism
Removing the upper bridge for the winding mechanism revealed the gears for winding, and under them some expected wear in the pivot holes.
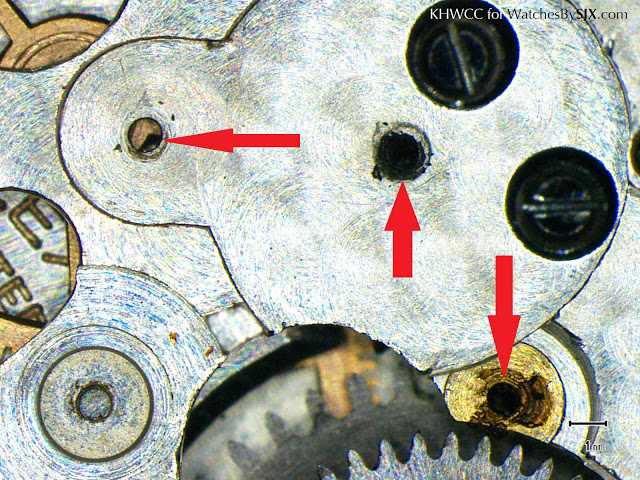
The pivot holes are fixed with new bushings, essentially circular metal rings that fit into the enlarged pivot hole to restore it to the original factory spec diameter. These bushings are turned on a lathe, then friction fit into the bridge. Each bushing has to be matched up in size with the newly burnished pivots to give the pivots a small lateral play which is called side-shake, needed for them to function correctly.
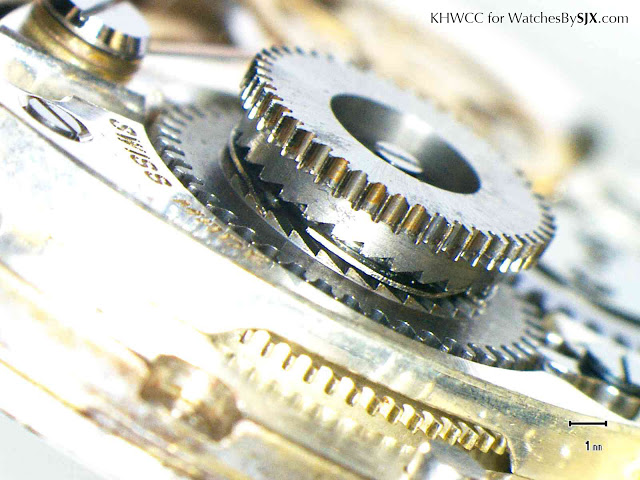 |
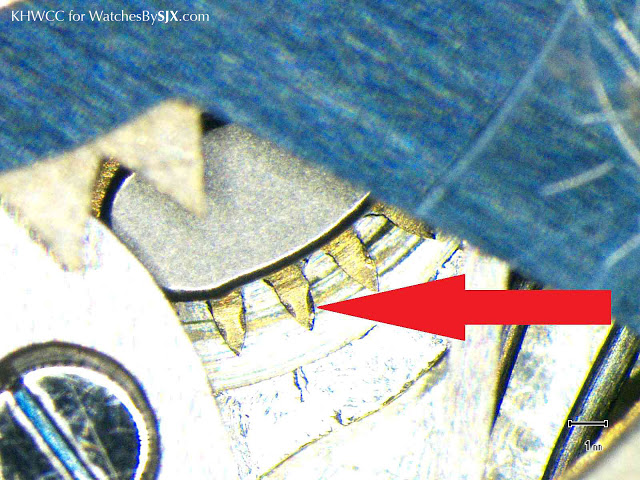
| The Breguet uncoupling that winds the ratchet wheel in one direction and slides free in the other direction. |
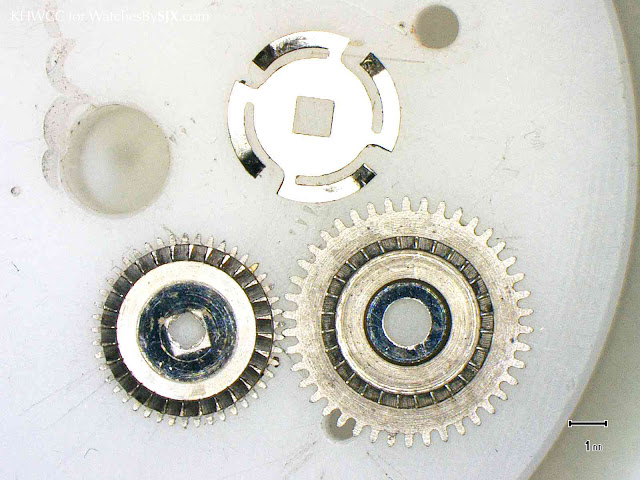 |
| The Breguet uncoupling disassembled: |
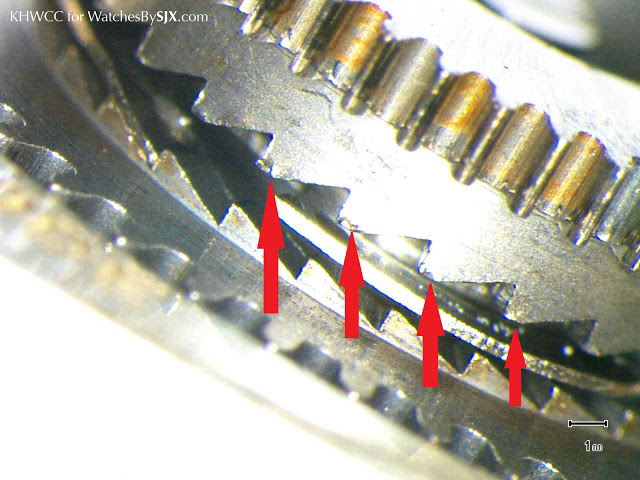 |
| Some wear visible on the teeth of the Breguet uncoupling |
I left the wear on the gears was as is since they were not enough worn to cause any problems. Usually the best solution is to find a new old stock wheel for that calibre or to make a new wheel if the correct wheel is not found, since repairing a wheel is difficult or impossible. Removing the automatic bridge reveals the movement below, including the unusual balance wheel.
Cleaning movement surfaces and jewel holes
Dirt and remnants of old lubricant in the pivot holes is first removed by hand with peg wood sharpened to a point. Once the jewel holes have all been pegged out and cleaned, the bridges and main plate with the jewel bearings are put in an ultrasonic machine, cleaning the parts in different cleaning and rinsing solutions. Other components are similar cleaned.
Re-burnishing worn pivots
In older watches very often the pivots are scored from running dry, they then have to be re-burnished. The process applies a functional polish with the Jacot tool, a pivot polishing lather. The technique make the pivots harder on the outside, leaving them more wear resistant.
Replacing the balance staff
In older watches without shock absorbers it is common to see balance staff pivots broken as a result of sudden jolts that a modern, shock resistant watch can withstand. A broken balance staff cannot be fixed, instead a new balance staff has to be fitted.
First the hairspring and roller have to be removed in order to be able to take out the broken balance staff. A new balance staff is then riveted to the balance spring with the staking set, and after the riveting the roller can be friction-fitted to the new balance staff.
Next, the balance would need to be trued in the flat and checked in the round as well as statically poising the balance, when that has been done the hairspring can then be attached in its correct position and the stud can be attached to the bridge and adjusted in beat and the timing of the watch can commence.
Shellacking
Shellac is a natural adhesive, a resin produced by the female lac bug, and used as the bonding agent for pallet and roller jewels in mechanical watches. In older watches it is common for the shellac to have come off from the pallet or roller jewels. So fresh shellac has have to be applied over the jewels with heat. Once it cools the shellac hardens and holds the jewels securely in place.
Hairspring
Adjusting balance springs is an art in itself and requires hundreds of hours of practice. The goal is a balance spring that runs true, being perfectly flat and round. Often with old watches, and in some cases even new watches, the balance spring is out of round or flat, or both, and needs correcting in order to have the best possible rate.
The reason a balance spring may be out of round or flat is sometimes due to a sharp shock, for instance the watch being dropped. Watchmakers correcting the balance spring typically use simple tools such as fine tweezers, forming the hairspring by hand to make it flat and round.
Case polishing
I decided to go easy on the polishing in order to preserve as much of the case material as possible. I used a technique to bring out the scratches and dents, so I could polish only specific areas and leave as much as possible untouched.
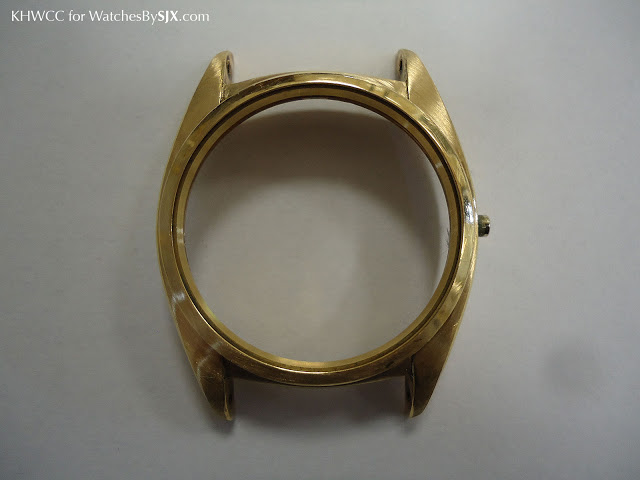
I used a marker to completely cover the case in black ink, and then rubbed off the ink with a fine abrasive paper. The paper only removed the ink from the smooth surfaces, and not the ink inside dents and deeper scratches, thus highlighting the parts that needed work.
 |
| The remaining ink highlights dents and nicks in the case |
Next I used abrasive material to smooth out the scratches and dents. Extra care was taken not to remove too much material. The final step was to buff the case to a high gloss while leaving the straight grained surfaces original, creating a sharp contrast between the two surface finishes.
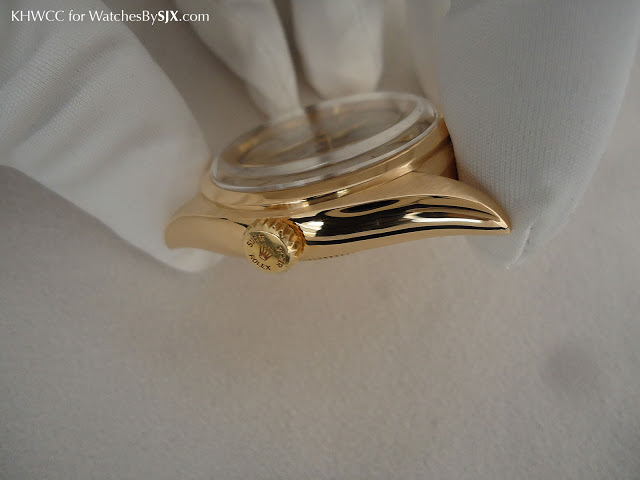
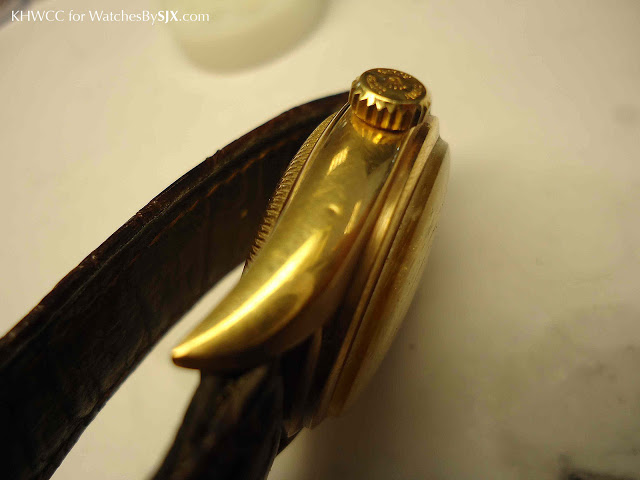
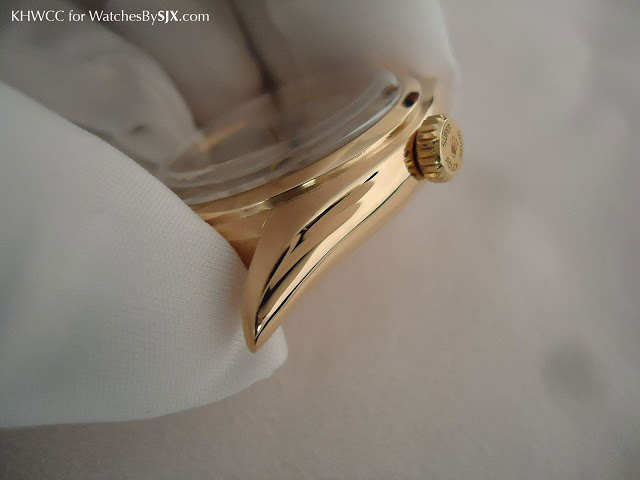 |
| The lugs taper to a sharp point characteristic of the Oyster case |
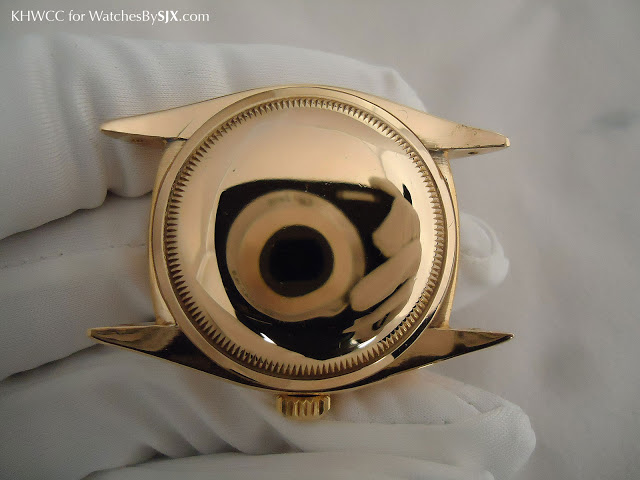 |
| The mirror-finished case back |
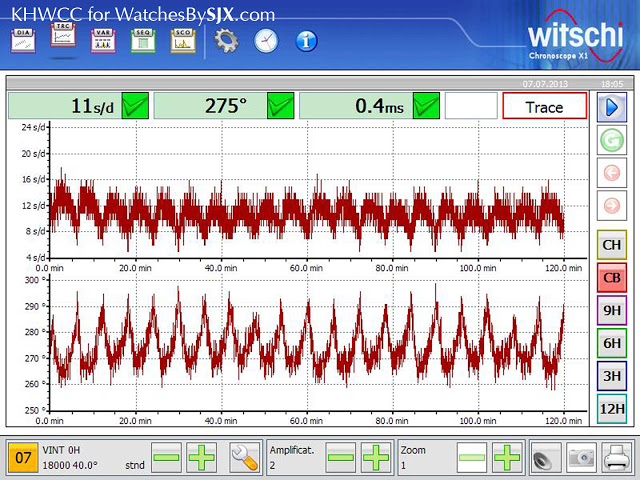
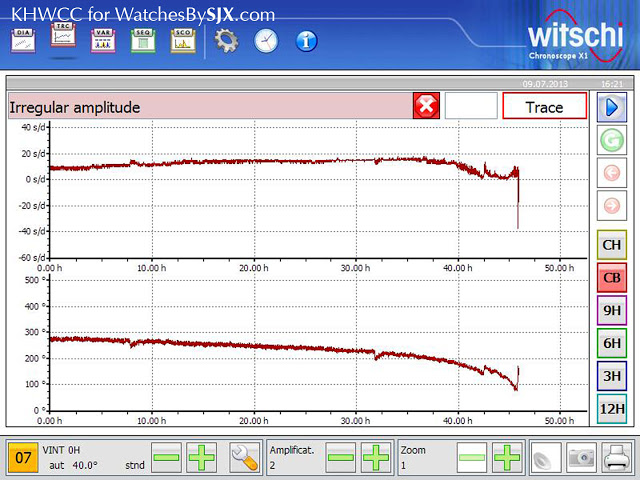
After restoration The results of the restoration speak for themselves.

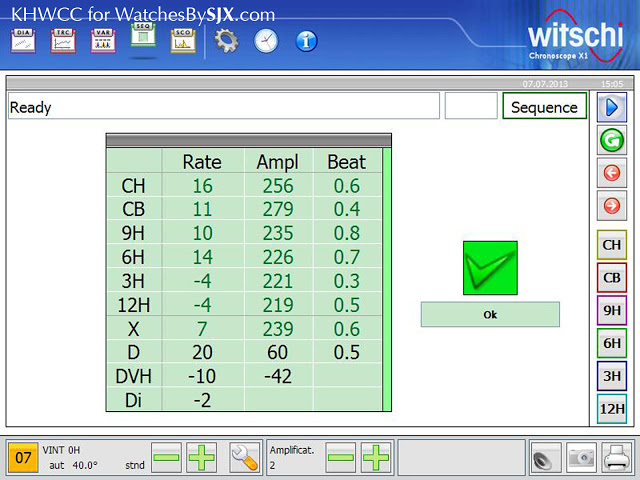 |
| All green and good to go |
___________________________
The author of this article on restoration is Henrik Korpela, principal of K&H Watchmaking Competence Centre (KHWCC) in Le Locle, Switzerland. KHWCC offers training in the classical techniques of watchmaking. A equipped independent academy that offers intimate class sizes, KHWCC offers a two-year, comprehensive programme. The curriculum covers both modern and classical watchmaking techniques, encompassing all the skills needed for watchmaking, repair and restoration. Additional information on the school and its programme can be found on the KHWCC website. Running KHWCC and teaching is his primary vocation, however, Henrik occasionally offers restoration services like that detailed here. He can be reached directly or via his commercial partner Shawn Tan.
Back to top.